Antho's OpenGL Series
This random group of tutorials cover a variety of topics relating to OpenGL. This is NOT a step by step guide. This is series aimed at beginners.
This tutorial series assumes a decent understanding of OpenGL 3.3 and C++11.
If you don't have much experience with C++ I can read up on <www.learncpp.com>.
If you have any questions, read the FAQ before asking!
Other resources and tutorials related to graphics and game developent are linked in the Additional Resources section.
Note that not all topics are final at this point and are subject to change!
You may contact me to ask questions or to request additional topics to be covered. If you want to help support what I am doing, please consider donating.
Introduction
General Setup
This group of tutorials cover general programming topics.
premake5
Premake is a simple build system using the lua programming language. I prefer this over cmake for a few reasons.
- Project configurations are easier to follow
- Tool specific languages tend to be underdocumented
- cmake can get pissy about whitespace
- Having a general language built in can be very powerful
Do take into consideration that premake is not nearly as widely adopted as cmake so more often then not you'll have to configure the scripts yourself. For this reason I purposfully choose libraries that are easy to build.
General Directory Structure
The directory structure I use is to make the project as easy to navigate as possible. The directory structure is shown below. Git and other toolchains may add more to this but generally aren't too important to worry about. We just add them to the .gitignore.
project_root
├─ bin // Binaries, libraries, and debug symbols
├─ bin_int // Compilation and linkage intermediates
├─ app // Project
│   ├─ build.lua // Project build script
│   ├─ source // Project source code
│   └─ vendor // Single header libraries
├─ premake // Premake scripts for third party libraries
├─ vendor // Third party libraries, typically added via git submodules
├─ working // Working directory (assets)
└─ premake5.lua // Main build script
Configuring the Main Build Script
The main build script mostly contains default values for all dependencies and projects. The generalized script is shown below with comments.
premake5.lua
workspace "workspace_solution_name"

-- What architectures to support
-- I only bother supporting 64-bit
architecture "x86_64"

-- List of configurations
-- `debug` and `release` are typical, `dist` is an extra level above release for removing as much debugging as possible
configurations { "debug", "release", "dist" }

-- This will be the default startup project
startproject "app"

-- Use all CPU cores for compilation
flags "MultiProcessorCompile"

-- Use latest language versions
language "C++"
cppdialect "C++latest"
cdialect "C17"

-- Link the static runtime, makes applications a bit larger
-- but prevent end users from ever missing a required dll
staticruntime "On"

-- Basic optimization technique
stringpooling "On"

-- Edit and continue may interfere with certain debugging tools
editandcontinue "Off"

-- By default most projects will be static libraries
-- This can and will be overwritten occasionally
kind "StaticLib"

-- Specify build paths
-- Eg: bin/windows_debug/app.exe
-- Eg: bin/linux_release/app
targetdir "%{wks.location}/bin/%{cfg.system}_%{cfg.buildcfg}"
objdir "%{wks.location}/bin_int/%{cfg.system}_%{cfg.buildcfg}"

-- Setup configuration for debug builds
filter "configurations:debug"
runtime "Debug"
optimize "Debug"
symbols "On"
defines "_DEBUG"
defines "APP_DEBUG" -- A friendly macro for your own code

-- Setup configuration for release builds
-- Similar in concept but using release settings
filter "configurations:release"
runtime "Release"
optimize "Speed"
symbols "On"
defines "NDEBUG"
defines "APP_RELEASE"

-- Setup configuration for dist builds
filter "configurations:dist"
runtime "Release"
optimize "Speed"
symbols "Off"
defines "APP_DIST"

-- Additional optimization for dist
flags { "LinkTimeOptimization", "NoBufferSecurityCheck" }

-- Windows specific flags
-- Windows can be a bit weird in terms of compliance
filter "system:windows"
systemversion "latest"
-- The MIN and MAX macros are annoying
defines { "NOMINMAX", "APP_WINDOWS" }

-- `/EHsc` controls exception stack unwinding, Uses standard unwinding and assumes `extern "C"` functions are `nothrow`
-- `/Zc:preprocessor` enables the preprocessor to be conforming
-- `/Zc:preprocessor`makes makes the `__cplusplus` get defined correctly, this is usually default off, we arent in the early 2000s anymore
-- `/experimental:c11atomics` msvc still considers c atomics as experimental, every other major toolchain this is not the case
buildoptions { "/EHsc", "/Zc:preprocessor", "/Zc:__cplusplus", "/experimental:c11atomics" }

-- For linux all we need is our define
filter "system:linux"
defines "APP_LINUX"

-- For dist builds on windows, we want to use the winmain entrypoint, we'll just define a macro for this and define it further in code
filter { "configurations:dist", "system:windows" }
defines "APP_ENTRY_WINMAIN"

-- Clear our filters
filter {}

-- Include all premake files within the premake directory
-- We put them into the dependencies group
-- Groups dont affect code generation whatsoever

group "dependencies"
for _, matchedfile in ipairs(os.matchfiles("premake/*.lua")) do
    include(matchedfile)
end
group ""

-- Include our apps build file
include "app/build.lua"
These just consider our defaults, we have to configure each project but with our defaults this is much easier to do.
Configuring the Main Project Script
app/build.lua
project "app" -- Matches startproject in main script
debugdir "../working" -- Set the working directory to the one in our directory structure
kind "ConsoleApp" -- Override the type to be a console app

-- Include all files of the following types
files {
	"%{prj.location}/**.cpp",
	"%{prj.location}/**.cc",
	"%{prj.location}/**.c",
	"%{prj.location}/**.hpp",
	"%{prj.location}/**.h",
	"%{prj.location}/**.inl",
}

-- Add these directies to our include paths
-- Third party includes go here too
includedirs {
	"%{prj.location}",
	"%{prj.location}/source",
	"%{prj.location}/vendor",
}

-- Link to our third party libraries (none rn)
links {}

-- On windows include the .rc files
-- Link to the opengl32 dll
filter "system:windows"
files "%{prj.location}/*.rc"
links "opengl32"

-- On windows dist we want winmain
filter { "configurations:dist", "system:windows" }
kind "WindowedApp"

-- On linux we need to link against these libraries
filter "system:linux"
links { "pthread", "dl", "m" }
Generating Project Files
To generate project files from our scripts we simple execute premake5.
premake5 --help will show you the available targets, gmake2 and vs2022 will be your most common targets.
Adding Third Party Libraries
The setup is generally pretty simple. We prefer to build from source.
- add the library as a submodule inside
vendor/library_name - If the library needs compilation
-
- If the library includes a premake script, add it the
premake5.luafile
- If the library includes a premake script, add it the
-
- Otherwise create your own inside
premake/, you must properly define the symbols, include directories and files.
- Otherwise create your own inside
-
- Add the library to the
linksblock insideapp/build.lua
- Add the library to the
- Add relavent include path include
app/build.lua. Commonly will look like"%{wks.location}/vendor/library/include"
Debugging
A surprising amount of OpenGL tutorials online do not cover debugging very well. I believe having good debugging tools is essential for anyone learning graphics programming.
RenderDoc
If you're working with OpenGL you NEED to learn renderdoc. Download it and try it out.
Challenges with debugging with RenderDoc
During early rapid development, you'll encounter bugs which RenderDoc may help you out. However this requires you to manually launch your application using RenderDoc. Beginners tend to have issues specifing the correct working directory and executable location. On top of this RenderDoc can't help if the bug your hunting down isn't easy to reproduce.
Wouldn't it be helpful to ALWAYS have RenderDoc attached to your application and your debugger at the same time? This can be done! Plus we can get some pretty cool extra features too such as customizing RenderDoc keybinds and triggering captures within code.
Loading the RenderDoc shared library
Attaching RenderDoc can be pretty simple; Just load the RenderDoc shared library before you create your rendering context.
C and C++ don't have a standard way to do this so we must either use third party libraries or manually use OS apis. For this tutorial I will demonstrate the process using both Windows and Unix operating system APIs.
We're going to define a few files to make implmentation easy across platforms. The .inl files will be conditionally included into the .cpp depending on the platform.
rdoc.hpprdoc.cpprdoc_win.inlrdoc_linux.inl
The header and source files are pretty simple.
rdoc.hpp
void setup(bool load); // Used to attach and detect renderdoc

// Uses the renderdoc apis
bool is_attached();
bool is_target_control_connected();
bool is_frame_capturing();
void trigger_capture();
void launch_replay_ui();
rdoc.cpp
#include "rdoc.hpp"
#include <renderdoc_app.h> // found in your renderdoc installation directory

namespace {
	RENDERDOC_API_1_0_0* gApi = nullptr;
}

#ifdef APP_WINDOWS // True for windows
#	include "rdoc_win.inl"
#endif

#ifdef APP_LINUX // True for linux
#	include "rdoc_linux.inl"
#endif

void setup(bool load) {
    attach_shared_lib(load); // Load shared library
    if (!is_attached()) return;

    // If attached, configure
    gApi->MaskOverlayBits(eRENDERDOC_Overlay_None, eRENDERDOC_Overlay_None);
    gApi->SetCaptureOptionU32(eRENDERDOC_Option_DebugOutputMute, 0);
}

bool is_attached() {
    return gApi;
}

bool is_target_control_connected() {
    if (!gApi) return false;
    return gApi->IsTargetControlConnected();
}

bool is_frame_capturing() {
    if (!gApi) return false;
    return gApi->IsFrameCapturing();
}

void trigger_capture() {
    if (gApi) gApi->TriggerCapture();
}

void launch_replay_ui() {
    if (gApi) gApi->LaunchReplayUI(true, nullptr);
}
Inside the following inl files use os specific apis, since these are conditionally included, the headers and apis dont need preprocessor guards.
rdoc_win.inl
#include <format>

#include <Windows.h>
#include <shlobj_core.h>

namespace {
	void attach_shared_lib(bool load) {
        // Is the shared library already loaded (ie: Lauched via renderdoc)
		HMODULE library = GetModuleHandleA("renderdoc.dll");

        // If not and we want to attach the shared library
        // Attempt to do so
		if (load && library == nullptr) {
            // Fetch program files directory
			CHAR pf[MAX_PATH];
			SHGetSpecialFolderPathA(nullptr, pf, CSIDL_PROGRAM_FILES, false);

            // Attempt to load the shared library
			library = LoadLibraryA(std::format("{}/RenderDoc/renderdoc.dll", pf).c_str());
		}

        // If the library is still not attached then renderdoc is unavailable
		if (library == nullptr) return;

        // Fetch the renderdoc api function and load them
        // See: https://renderdoc.org/docs/in_application_api.html
		pRENDERDOC_GetAPI getApi = (pRENDERDOC_GetAPI)GetProcAddress(library, "RENDERDOC_GetAPI");
		if (getApi == nullptr) return;
		getApi(eRENDERDOC_API_Version_1_0_0, (void**)&gApi);
	}
}
rdoc_linux.inl
#include <dlfcn.h>

namespace {
    // Control flow is nearly identical to using the windows api except dlopen already knows about library paths
	void attach_shared_lib(bool load) {
		void* library = dlopen("librenderdoc.so", RTLD_NOW | RTLD_NOLOAD);
		if (load && library == nullptr) library = dlopen("librenderdoc.so", RTLD_NOW);
		if (library == nullptr) return;

		pRENDERDOC_GetAPI getApi = (pRENDERDOC_GetAPI)dlsym(library, "RENDERDOC_GetAPI");
		if (getApi == nullptr) return;
		getApi(eRENDERDOC_API_Version_1_0_0, (void**)&gApi);
	}
}
Conclusion
Having the ability to load and customize how RenderDoc behaves directly in our application provides a great flexability. We can load renderdoc based on anything. (As long as that decision is made before your context is created.) This means for debug builds we can always attach RenderDoc. We can implement our own frame captures. Save caputure files. Loading RenderDoc like this also avoids the confusing topic of working directories as your current tools still control this.
Theres much more that you can do, but with basics covered I'll leave that as a topic for your own exporation.
Reference implementation
VulpEngine has an implmentation of this.
https://github.com/anthofoxo/vulpengine/tree/master/src/rdoc
KHR_debug
This is an OpenGL extension that adds some very useful debugging tools
- This extension is core in OpenGL 4.3+.
- View this extentions in the Khronos Registry.
If you're using a version of OpenGL older than 4.3. You should check against your function loading api for extension support.
If using glad just include the extension when generating the loader and after loading your functions check against GLAD_GL_KHR_debug.
Debug Messaging
With debug messaging we can recieve meaningful message on the state of OpenGL through a callback function.
This effectively replaces glGetError.
You may need a debug context for this to work. If you're using GLFW this can be achieved with a window flag.
glfwWindowHint(GLFW_OPENGL_DEBUG_CONTEXT, GLFW_TRUE)
To set this up you just need two api calls.
glEnable(GL_DEBUG_OUTPUT);
glDebugMessageCallback(&message_callback, nullptr);
The callback function must match this signature.
void callback(GLenum src, GLenum type, GLuint id, GLenum severity, GLsizei length, GLchar const* msg, void const* user_param)
If you want useful stacktraces within the call back you'll want to enable GL_DEBUG_OUTPUT_SYNCHRONOUS. Do note this will have a performance impact and should only be done for debug.
Example
static void message_callback(GLenum source, GLenum type, GLuint id, GLenum severity, GLsizei length, GLchar const* message, void const* user_param) {
	std::cout << message << '\n';
}

void main() {
    // ...
    glfwWindowHint(GLFW_OPENGL_DEBUG_CONTEXT, GLFW_TRUE);
    GLFWwindow* window = glfwCreateWindow(...);
    // ...
    glfwMakeContextCurrent(window);
    gladLoadGL(&glfwGetProcAddress);
    // ...

    if (GLAD_GL_KHR_debug) {
        glEnable(GL_DEBUG_OUTPUT);
        #ifdef _DEBUG
        glEnable(GL_DEBUG_OUTPUT_SYNCHRONOUS);
        #endif
        glDebugMessageCallback(&message_callback, nullptr);
    }

    // Do something bad to trigger the message callback
    GLuint program = glCreateProgram();
    glDeleteProgram(program);
    glDeleteProgram(program); // Double free
}
Debug Groups
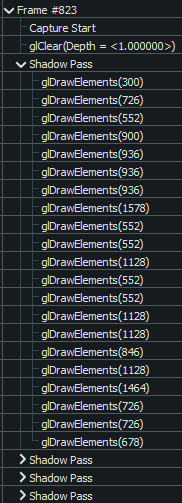
KHR_debug also introduces debug groups. This is most helpful when debugging with RenderDoc. This lets up group api calls together.
Pushing and Popping Groups
constexpr GLuint myId = 0; // Can be whatever you want
glPushDebugGroup(GL_DEBUG_SOURCE_APPLICATION, myId, -1, "Shadow Pass");

// All following OpenGL api calls will be under the `Shadow Pass` Group.

glPopDebugGroup();
Within RenderDoc you can see the debug groups in action.
Additional Resources
Another guide for debug output
Rendering
This section shows some rendering tricks I use to handle drawing certain things in a graphics pipeline.
Skyboxes
Skyboxes are conceptually a pretty simple idea: Attach a cube to the camera and draw a cubemap. This can certainly be approached like this but I'll be showing a couple tricks I use to make this easier and more bug free.
The Mesh
The mesh for a skybox I use is the default blender cube with the face normals flipped.
To be more specific: A flat shaded cube where it's vertex positions lie on the +-1.0 planes on each axis, and the face normals pointing to the origin.
(Flipping normals in blender reverse winding order)
When exporting this I only export the position data. We don't export any extra information, thus we can compact the mesh data to be smaller.
The vertex positions are the texture coordinates
To sample a cubemap you use a 3D vector from the origin pointing the the point you want to sample on the cubemap. Using this cube lets us directly pass the positions as texture coodinates with no additional processing in the shader code.
No world transform
I render my skyboxes without a world transform. This is inherently unnessesary. Why transform the cube somewhere just for the view matrix to transform it back. Simply doing this unnessesary math also helps us avoid floating point precision errors.
The one thing we still need to account for is the camera orientation. This is still pretty simply to accomplish.
Consider your standard vertex matrix multiplication:
gl_Position = projection * view * transform * vec4(position, 1.0);
This is pretty standard to place objects within your world. But this can be modified to easily account for how to want our skybox positioning to work.
gl_Position = projection * vec4(mat3(view) * position, 1.0);
- Firstly we remove our world transform multiplication, this isn't needed.
- Next we cast the view matrix to a
mat3. The result of this is that the last row and column gets removed. This removes tralsation from the camera. - Group the now
mat3with thevec3to satisfy matrix vector multiplication rules.
Depth testing
Without modifying how we render the object, it'll perform its depth testing just like any other object and not really look like a skybox. There's a couple ways to fix this. One is to simply disable depth testing and thus depth writing. As long as we draw the skybox first, it'll look correct.
Draw order
Generally we want to reduce overdraw as much as possible. The skybox can easily be drawn last in the opaque 3D pipeline.
Consider the case where it's drawn first, given its locked to the camera, an entire framebuffer's worth of pixels will be computed. Some values will eventually be discard when you draw something that covers any portion of the skybox. This is not ideal as we have just wasted performance calculating some of those fragments.
However to draw it last requires us to be able to depth test. Luckily there's some simple shader trickery to allos us to do this.
Shader trickery
In OpenGL the depth of each fragment gets computed for every fragment that gets rasterized. With a value of 1 meaning the depth is at the far clipping plane.
We can force the depth calculations for our skybox to evaluate to 1. Meaning even when drawn last, it'll still render behind everything and still restpect depth testing.
The rendering pipline has a fixed function step known as perspective division. This is done for perspective correct texture mapping, but that is another topic for later. This means at some point in the shader pipeline this gets computed: gl_Position.xyz /= gl_Position.w.
After we compute gl_Position we can simply set the z value to the w value. After perspective division this will force the depth value to be 1.
After apply this step you will notice some clipping at the far plane.
Depth function
With our depth values being 1 we will face Z clipping issues, since values >= 1.0 get clipped. This is given by the default state of glDepthFunc(GL_LESS). This affects how depth testing works. For the skybox we can make a simple adjustment: glDepthFunc(GL_LEQUAL).
Changing this state will fix the clipping issue, this effectivly means our clipping range now includes the 1.0 value. This can be done globally for your application as this doesn't negativly affect rendering other objects.
Conclusing
In graphics rendering everything is just approximations and illusions. By breaking our traditional rendering rules we simplified the process to draw a skybox and probably broken the skybox illusion.
Not all skyboxes are handled like this. This is just the method I like using as of writing.
Potential future topics?
A list of future topics I would like to detail, in no particular order:
- Better Logging
- Stacktraces
- Scripting
- Better shader uniform checks
- OpenGL extensions
- Anistropic filtering
- Complex terrain rendering
-
- Quadtree
-
- LODS
-
- Frustum culling
-
- Heightmaps and normalmaps
-
- LOD Morphing
-
- Triplanar mapping
-
- Foliage
-
- Batching and masks
- Font rendering
- Particle systems
- HDR, gamma correction and tone mapping
- Bloom
- Shadow mapping (point and directional)
- Screen Space Ambient Occlusion
- Water Rendering
- Screenspace effects
I can be contacted via discord @AnthoFoxo#6447 Additional contact information is here
FAQ
Q: What is OpenGL?
A: OpenGL is a cross-language, cross-platform API for rendering 2D and 3D vector graphics.
Q: Is there source code?
A: Nope! Read the topics.
Some other external opengl links are provided here. These contain much more content then I myself could ever write here.
Additional Resources
OpenGL Reference / Wiki pages
- https://github.com/KhronosGroup/OpenGL-Refpages
- https://github.com/KhronosGroup/OpenGL-Registry
- https://github.com/KhronosGroup/OpenGL-API
- https://docs.gl
- https://www.khronos.org/opengl/wiki
- https://www.khronos.org/registry/OpenGL/extensions
OpenGL Tutorials
Text Tutorials
- https://learnopengl.com (This is a really good place to start)
- https://ogldev.org
- https://webglfundamentals.org
- http://www.opengl-tutorial.org
- https://open.gl
- https://lodev.org
- https://github.com/fendevel/Guide-to-Modern-OpenGL-Functions
YouTube Tutorials
- Cherno C++ Playlist
- Cherno Game Engine Playlist
- Cherno OpenGL Playlist
- Cherno Batch Rendering Playlist
- Brian Will OpenGL Playlist
- PardCode OpenGL Playlist
- thebennybox SDL OpenGL2 Playlist
Other resources
Graphics
- Gentle Introduction to GPUs inner workings
- OpenGL Hardware Database by Sascha Willems
- MaterialX Library (Free to use textures and materials)
- Mouse Picking with Ray Casting
- GPU drivers crash with long computations
- Drawing Lines is Hard
- Computer Graphics from Scratch
- Triangulation
- McGuire Computer Graphics Archive
- Advanced Terrain Texture Splatting
Physics
- https://blog.winter.dev/2020/designing-a-physics-engine
- https://blog.winter.dev/2020/gjk-algorithm
- https://blog.winter.dev/2020/epa-algorithm
- https://math.kwengine.de/2021/08/collision-volume-sutherland-hodgman (In German)
Audio
- Play OGG files using stb_vorbis and OpenAL (Older for LWJGL/Java)
- https://miniaud.io/
- https://github.com/nothings/stb/blob/master/stb_vorbis.c
Scripting
- https://www.lua.org/
- https://blog.molecular-matters.com/2014/05/10/using-runtime-compiled-c-code-as-a-scripting-language-under-the-hood/
Other
OpenGL / GLSL Specification Documents
- OpenGL 4.6 Core
- OpenGL 4.6 Compat
- GLSL 4.60
- OpenGL 4.5 Core
- OpenGL 4.5 Compat
- GLSL 4.50
- OpenGL 4.4 Core
- OpenGL 4.4 Compat
- GLSL 4.40
- OpenGL 4.3 Core
- OpenGL 4.3 Compat
- GLSL 4.30
- OpenGL 4.2 Core
- OpenGL 4.2 Compat
- GLSL 4.20
- OpenGL 4.1 Core
- OpenGL 4.1 Compat
- GLSL 4.10
- OpenGL 4.0 Core
- OpenGL 4.0 Compat
- GLSL 4.00
- OpenGL 3.3 Core
- OpenGL 3.3 Compat
- GLSL 3.30
- OpenGL 3.2 Core
- OpenGL 3.2 Compat
- GLSL 1.50
- OpenGL 3.1
- OpenGL 3.1 with GL_ARB_compatibility
- GLSL 1.40
- OpenGL 3.0
- GLSL 1.30
- OpenGL 2.1
- GLSL 1.20
- OpenGL 2.0
- GLSL 1.10
- OpenGL 1.5
- OpenGL 1.4
- OpenGL 1.3
- OpenGL 1.2
- OpenGL 1.1
- OpenGL 1.0